Changing a Diaper Genie can seem tricky at first. But, with a few steps, it becomes easy.
A Diaper Genie is a must-have for many parents. It keeps nurseries fresh by locking in odors. This clever tool makes diaper disposal a breeze. Yet, figuring out how to change it can stump new users. Many parents feel lost when it’s time to empty and reload it.
Fear not! This guide will lead you through the process, ensuring a smooth experience. With clear instructions, you’ll master it in no time. Whether you’re a new parent or just need a refresher, this post will help. Let’s make diaper changing less of a chore and more of a simple task.
Introduction To Diaper Genie
Diaper Genie has become a household name for parents around the world. If you’re new to parenting or just looking for a more efficient way to manage diaper disposal, you’re in the right place. This ingenious invention is designed to make your life easier and your home fresher. Imagine saying goodbye to those unpleasant diaper smells! Let’s dive into what makes Diaper Genie a must-have for every nursery.
Purpose And Benefits
Diaper Genie is more than just a diaper disposal system; it’s a game changer for parents. The primary purpose is to contain odors and keep your nursery smelling fresh.
Think about the convenience of not having to run to the trash can every time you change a diaper. You can simply toss it into the Diaper Genie, and its airtight seal locks away odors.
The benefits are clear: less odor, less hassle, and more time for cuddles with your little one. Plus, it helps maintain a cleaner environment, which is crucial for your baby’s health.
Common Models
Diaper Genie offers a variety of models to suit different needs and budgets. Whether you’re looking for something basic or a more advanced version, there’s a model for you.
One popular option is the Diaper Genie Expressions, which allows you to customize its appearance to match your nursery decor. Isn’t it great to have practicality and style in one package?
Another favorite is the Diaper Genie Complete. It features a foot pedal for hands-free operation, making it even more convenient during those busy diaper changes.
Have you ever wondered which model suits your lifestyle best? It’s worth considering how often you change diapers and how much space you have in your nursery.
Changing diapers is an unavoidable part of parenting, but with Diaper Genie, it doesn’t have to be a dreaded chore. Whether you opt for the Expressions or the Complete, you’re investing in a cleaner, more pleasant environment for both you and your baby. So, which model will you choose to transform your diaper-changing experience?
Preparation Steps
Changing a diaper can be a simple task with the right preparation. By following the steps below, you ensure a smooth process. Preparation is key to making the experience stress-free and efficient. Let’s look at the essential steps to prepare for changing a Diaper Genie.
Gathering Supplies
Collect all necessary items before starting. You need a fresh diaper, baby wipes, and diaper cream. Having these supplies within reach saves time and keeps the baby safe. A full Diaper Genie refill is also important. It ensures you can dispose of the diaper without interruptions.
Selecting A Safe Location
Choose a safe, clean spot to change the diaper. A changing table with raised sides is ideal. It prevents the baby from rolling off. If using a different surface, use a changing pad. This provides comfort and safety for your baby. Ensure the location is free from distractions. Keep items like toys and phones out of reach.
Opening The Diaper Genie
Opening the Diaper Genie can seem tricky at first. But it’s easy once you know the steps. This guide helps you understand it better. Follow these simple steps to get it right.
Unlocking Mechanism
The Diaper Genie has a built-in locking system. It ensures that the lid stays secure. To unlock, locate the latch on the side. Press it gently to release the lock. Ensure you’re holding the base firmly. This prevents the Genie from tipping over.
Removing The Lid
Once unlocked, you can remove the lid. Lift it straight up with both hands. Be careful not to tilt it. This keeps the contents stable. Set the lid aside in a clean area. Now you have full access to the inside.
Credit: diapergenie.com
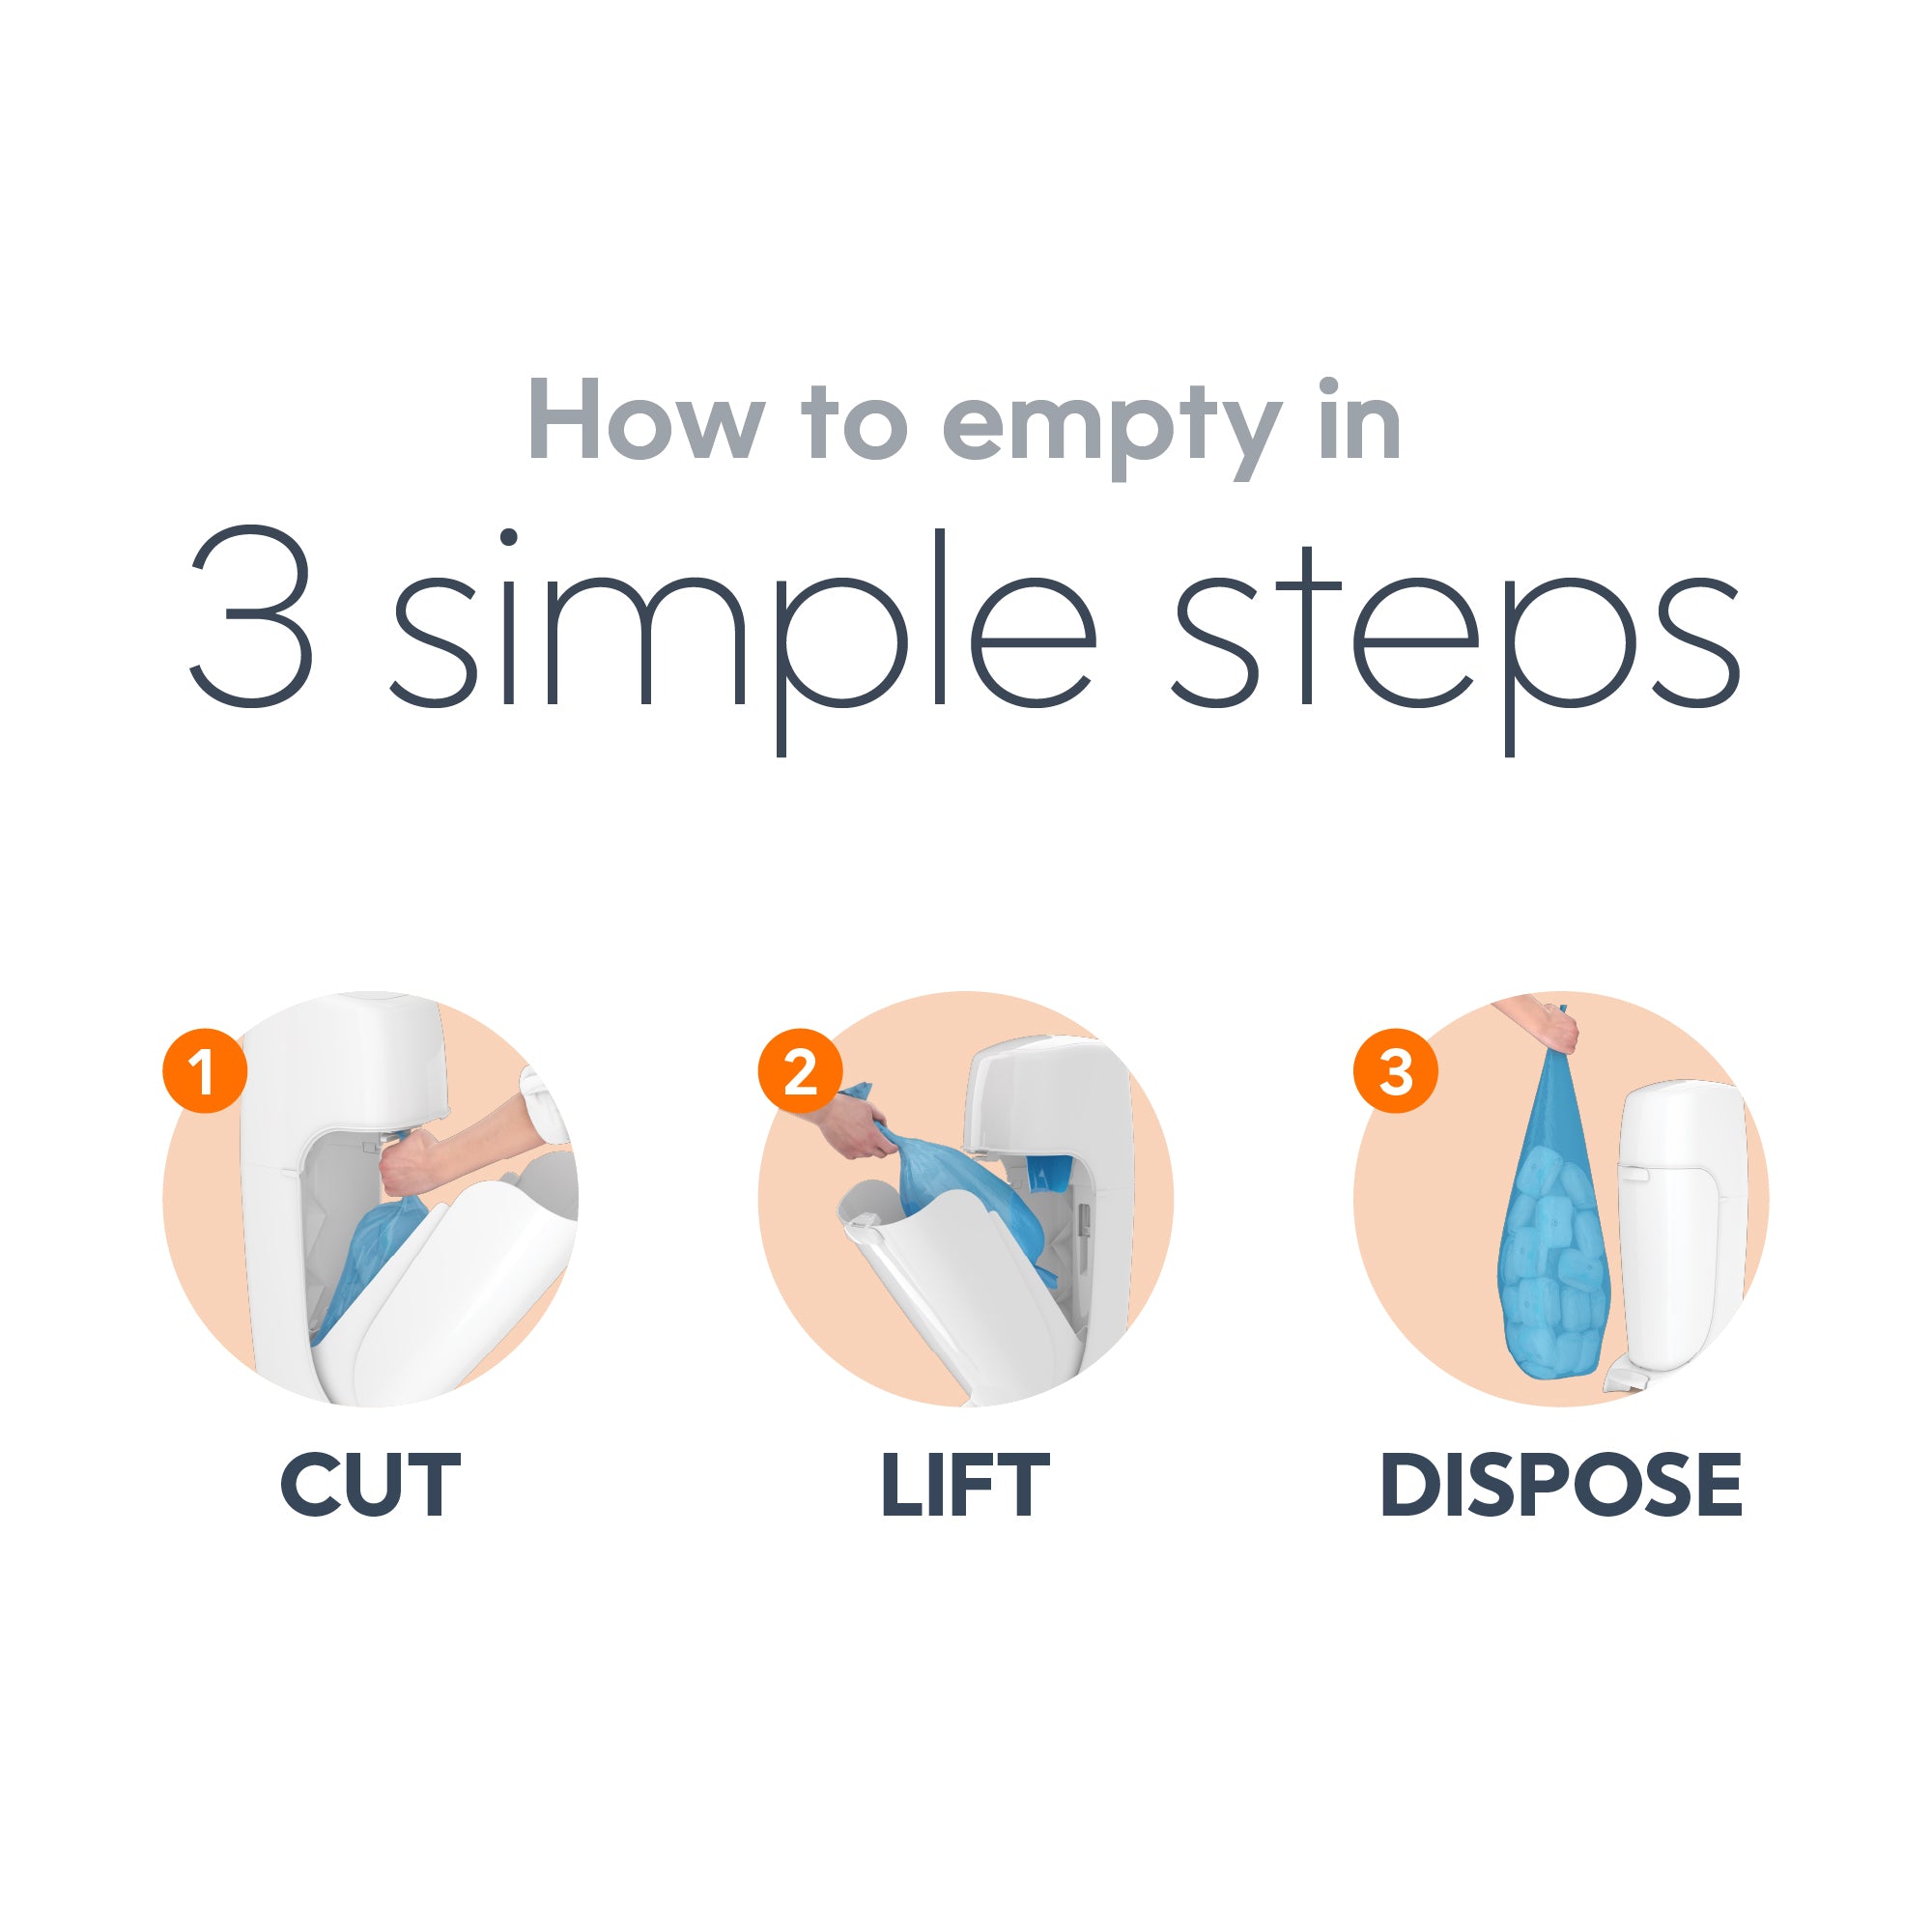
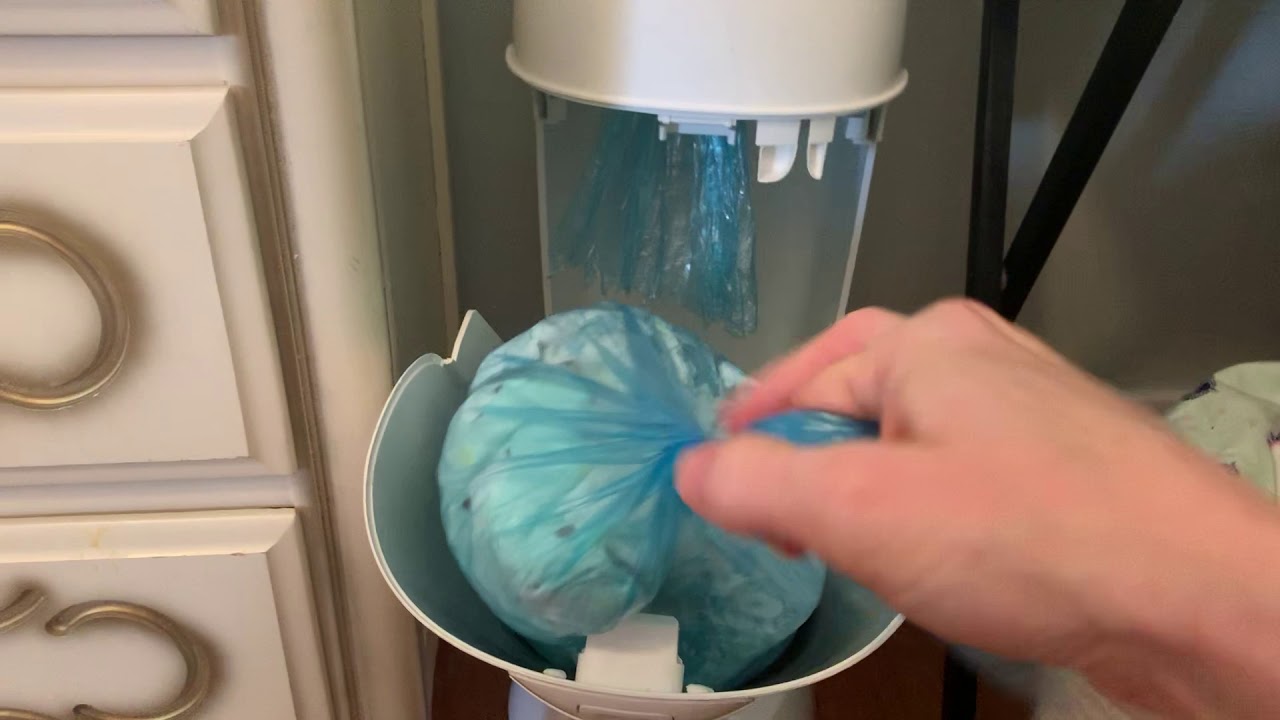
Removing Used Bags
Changing the Diaper Genie is simple. First, open the lid and pull out the used bag. Then, tie the new bag securely at the bottom. Close the lid, ensuring everything is snug and ready for use. Clean and easy.
Changing a Diaper Genie can seem like a daunting task at first, but with a little guidance, it becomes a simple routine in your parenting journey. One of the crucial steps in this process is removing used bags, which helps keep your nursery fresh and clean. As you master this skill, you’ll find that it not only saves time but also helps in maintaining a healthy environment for your little one.Identifying Full Bags
Recognizing when a bag is full might be more straightforward than you think. Do you often find the pail refusing to close properly? That’s a strong sign your bag needs changing.Sometimes, the smell is a dead giveaway. If the odor intensifies even after closing the lid, it might be time to swap out the bag. Keep an eye on these cues, as they make the process easier.Safe Disposal Tips
Your baby’s health and comfort are your top priorities, so disposing of used bags safely is essential. Always tie the top of the bag securely before removing it. This prevents any spillage and keeps those unwanted smells contained.Make sure to place the sealed bag in an outdoor trash bin promptly. This minimizes exposure to unpleasant odors in your living space. Can you imagine how much fresher your home feels when you follow this simple step?Consider using double bags if you’re dealing with an especially pungent load. This extra layer provides peace of mind and keeps your surroundings pleasant.Removing used bags might seem routine, but it’s a task that impacts your daily life significantly. By mastering these simple steps, you maintain a cleaner, healthier environment for your baby and yourself. What’s your go-to tip for ensuring a fresh nursery?Installing New Refill Bags
Changing a Diaper Genie refill bag is simple. First, open the lid and remove the empty cartridge. Next, insert the new refill bag and pull it through the top. Secure it in place, and close the lid. Your Diaper Genie is ready for use again.
Installing a new refill bag in your Diaper Genie is easy. This process ensures your Diaper Genie works efficiently. A fresh bag helps keep your nursery clean and odor-free. Let’s explore how to choose and install the right refill bag.Choosing The Right Refill
Pick the correct refill for your Diaper Genie model. Each model has specific refill requirements. Check the packaging for compatibility information. Most refill bags are made with odor-blocking technology. This feature keeps unpleasant smells at bay. Refill bags come in different sizes. Consider how often you change diapers. A larger size may reduce the frequency of bag changes.Proper Bag Placement
Start by opening the top of your Diaper Genie. Remove the empty bag cartridge. Take a new refill bag from its packaging. Find the open end of the bag. Place it in the top of the Diaper Genie. Make sure the bag sits evenly around the rim. Push the bag’s open end down into the pail. This step creates space for diapers. Close the top of your Diaper Genie securely. Your new refill bag is now ready for use.Sealing And Cutting Bags
Changing a Diaper Genie involves sealing and cutting the bags efficiently. First, press the button to cut the used bag. Then, tie a knot at the end to seal it securely before disposal.
Changing a Diaper Genie can seem like a daunting task, especially when it comes to sealing and cutting bags efficiently. However, with the right tips and a little practice, you’ll be an expert in no time. Properly sealing and cutting bags ensures that odors are contained and disposal is mess-free. Let’s dive into the steps to achieve a seamless experience.Using The Built-in Cutter
The Diaper Genie comes equipped with a handy built-in cutter. This is a lifesaver for quick and easy disposal.Locate the cutter inside the Genie. It’s usually near the top.Once the bag is full, pull it down to create a little slack.Slide the cutter across the bag. This ensures a clean cut, readying it for disposal.The cutter saves time and ensures you don’t have to fumble with scissors. Have you ever tried cutting a bag with one hand while holding a squirming baby with the other? The built-in cutter is your best friend in these moments.Ensuring A Tight Seal
Sealing the bag tightly is crucial to keep odors locked in. A loose seal can lead to unwanted smells and mess.After cutting the bag, tie a knot at the open end. Make it as tight as possible.For extra security, double-knot the end. This simple step can make a world of difference.Think about how a tightly sealed bag can save you from those unexpected whiffs of unpleasant odors.Have you ever walked into a room and immediately knew the diaper bin needed attention? Ensuring a tight seal prevents this from happening.By mastering these steps, you’ll find that changing the Diaper Genie becomes a quick and manageable task. What tips do you have for making diaper changing a smoother experience?Reassembling The Diaper Genie
Reassembling the Diaper Genie can be a straightforward task. Once you’ve cleaned and prepared all the parts, it’s time to put them back together. This process ensures your Diaper Genie functions properly, keeping odors at bay.
Securing The Lid
Place the lid on top of the base. Ensure it aligns with the opening. Push down gently until you hear a click. This sound means the lid is securely attached. A secure lid keeps odors contained.
Checking For Proper Fit
Verify the lid fits snugly. There should be no gaps between the lid and base. Gaps allow odors to escape. Inspect the seal around the lid. A proper fit ensures the Diaper Genie operates efficiently.
Credit: www.youtube.com
Maintenance And Care Tips
Changing a Diaper Genie is easy with a few simple steps. First, pull the refill through the top and tie a knot. Next, push the refill down into the Genie and replace the lid securely. Regularly empty the bag to prevent odor buildup and keep the nursery fresh.
Caring for your Diaper Genie is essential to keep it functioning efficiently and odor-free. Understanding the right maintenance and care tips not only extends its lifespan but also ensures a cleaner environment for your baby. Let’s dive into practical steps and insights to maintain your Diaper Genie with ease.Cleaning Routine
Regular cleaning of your Diaper Genie is crucial. Start by emptying the bag when it’s about 75% full to avoid overstuffing. Use a damp cloth with mild soap to wipe the exterior and interior surfaces. This prevents odor build-up and keeps it looking new.Consider setting a weekly reminder to sanitize the pail with a disinfectant wipe. This practice helps in reducing germs and maintains hygiene. Wouldn’t you want a fresh start every week?Troubleshooting Common Issues
Encountering issues with your Diaper Genie can be frustrating, but most problems have simple solutions. If the lid isn’t closing properly, check for any obstructions or overfilled bags. Adjusting the bag or removing debris often resolves this issue.Is your Diaper Genie not containing odors effectively? It might be time to replace the carbon filter. These filters are designed to absorb odors and should be changed every 90 days. Keeping an eye on these small components can make a big difference.Does the cutter blade seem dull? A quick check and clean can ensure it slices the bags efficiently. Maintaining these small parts ensures seamless operation. Have you ever considered how such small details impact your daily routine?Maintaining your Diaper Genie doesn’t have to be a daunting task. With these tips, you can ensure it remains a helpful tool in your parenting arsenal. What’s your go-to tip for keeping things fresh and clean?
Credit: www.tiktok.com
Frequently Asked Questions
How Do You Empty And Refill A Diaper Genie?
Open the Diaper Genie by pressing the button. Pull out the full bag and tie it. Cut the bag using the built-in cutter. Tie a knot at the end of the refill liner. Place it back in the Diaper Genie and close the lid.
How To Change Genie Bags?
To change genie bags, first, unzip the old bag from its compartment. Slide the new genie bag into place. Ensure it’s securely fastened, then zip it up. Always check for proper alignment to avoid leaks. Regularly replace bags to maintain hygiene and efficiency.
How To Change Bag On Diaper Genie Platinum?
Open the lid of the Diaper Genie Platinum. Pull out the refill ring. Knot the new bag’s end, insert it, and pull it down. Close the lid securely.
How To Change A Baby’s Diaper Step By Step?
Gather supplies like a clean diaper, wipes, and diaper cream. Lay baby on a clean surface. Unfasten the dirty diaper and clean the baby’s bottom with wipes. Slide a new diaper under the baby, apply cream if needed, and fasten securely.
Dispose of the old diaper properly.
How Do You Change A Diaper Genie Refill?
Open the lid. Remove the old refill. Insert a new one. Pull the bag through. Close the lid.
Conclusion
Changing the Diaper Genie is easy with simple steps. Start by removing the lid. Take out the old bag. Place a new refill in the top section. Pull the bag down and tie a knot at the end. Ensure the lid is securely closed.
Regularly changing the bag prevents bad smells. Keep your baby’s nursery fresh and clean. A clean Diaper Genie means less stress for parents. Follow these steps for hassle-free diaper disposal. Keep the process simple and effective. Enjoy more time with your baby without worry.