
You can resolve most issues with your device by performing a simple power cycle, as wildgame innovations camera troubleshooting often begins with checking the battery levels and memory card integrity. If the camera fails to power on or capture images, the most common cause is a depleted power source or a card that has reached its maximum storage capacity. Always ensure the batteries are fully charged and the SD card is formatted correctly before you attempt more complex fixes.
Troubleshooting Wildgame Innovations camera power problems
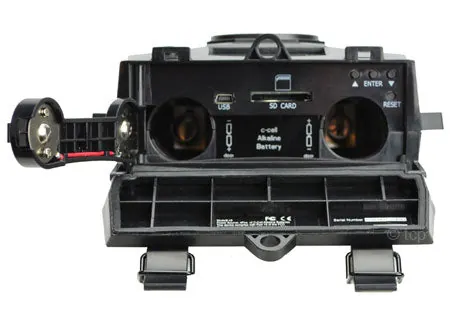
When your camera stops responding, the first step is to isolate the power supply. Many users assume a device is broken when it’s simply unable to draw enough current from aging batteries. If you’re using alkaline batteries, replace them with a fresh set of high-quality lithium batteries to see if the device regains functionality. Lithium cells maintain a steady voltage output for longer, whereas alkaline batteries suffer a steep drop-off as they deplete.
Cold weather often reduces the output of standard batteries. Check your Wildgame Innovations support documentation to verify the recommended temperature ranges for your specific model. If your camera is exposed to temperatures below 32 degrees Fahrenheit, expect your battery life to shrink by roughly 40 percent.
Another frequent cause of failure is a dirty or misaligned battery terminal. Over time, battery contacts can develop oxidation that blocks the flow of electricity. If you see white or blue residue on the metal springs, gently wipe them with a dry cloth or a cotton swab dipped in isopropyl alcohol.
If the screen remains blank after fresh batteries are installed and the terminals are clean, the internal circuit may have a fault that requires professional inspection. Never attempt to open the sealed housing yourself. Doing so voids your warranty and exposes sensitive components to moisture that the factory seals were designed to prevent.
If the unit still fails to power on after these steps, contact the manufacturer directly to initiate a service request. Attempting a DIY repair on a sealed board almost always results in permanent damage to the sensor or the logic board.
Resetting the internal hardware settings
If the camera powers on but fails to trigger images, you should perform a hard reset to clear any software glitches. Locate the reset button, which is usually a small pinhole near the battery compartment or the menu display.
Use a paperclip to press and hold this button for 10 seconds while the unit is powered on. This action clears the temporary memory and returns the device to its factory default settings, which often resolves conflicts caused by incorrect motion sensor sensitivity or delayed trigger intervals.
After the reset, check the status light on the front of the unit. If the light blinks red or stays solid when you walk in front of the lens, the sensor is likely functioning. If there’s no light, ensure the PIR sensor lens is free of mud or debris. A dirty lens can trick the camera into thinking there’s no movement, preventing it from recording.
If the camera still refuses to store images after a reset, the issue is likely a corrupted file system on the memory card. To test this, swap the card with a known working unit from another device. If the camera captures images immediately, reformat your original card using a computer rather than the camera menu. Formatting through the camera often fails to overwrite deep-seated file corruption.
If you see a blinking yellow light during this process, the camera is signaling a voltage drop. Replace the batteries with a fresh set of lithium cells. Alkaline batteries often lack the high-amperage burst required to trigger the shutter, even if they show a full charge on a standard tester.
Reformatting the storage media card
Memory cards are the most frequent point of failure in trail cameras because they’re constantly being written to and erased. If the camera shows a “card error” or simply stops saving files, you must reformat the SD card. Always move your images to a computer first, as formatting will permanently delete all data currently stored on the card.
Insert the card into a computer, open the disk management settings, and choose the FAT32 file system for cards 32GB or smaller, or exFAT for larger capacities. Using the wrong file system often results in the camera failing to mount the card entirely. If your card is 64GB or larger, avoid forcing it into FAT32, as the camera will likely report a corrupted volume despite a successful format.
Once the card is clean, insert it back into the camera while the power is switched off. Turn the camera on and wait for the status light to indicate it’s ready. If the camera still rejects the card, try a different high-speed SD card from a reputable brand to rule out a hardware incompatibility.
Many users mistake a slow write speed for a card error. If your camera records 4K video, ensure your card is rated at least Class 10 or U3. If the camera fails to recognize even a new, formatted card, the internal card reader slot may be physically damaged.
At this point, stop trying to force the card in, as you might bend the delicate pins inside the slot. A bent pin is a terminal failure that usually costs more to repair than the camera is worth.
Avoiding common trail camera mistakes
Many people believe that keeping the camera in the highest resolution setting is always best, but this often leads to slow shutter speeds and blurred images in low light. Using the lowest resolution during night hours can actually improve your hit rate. If your target is a fast-moving animal, prioritize a higher shutter speed over pixel count to ensure the subject remains sharp.
Never leave batteries in the device during the off-season. Acid leakage can corrode internal contacts within weeks, effectively killing the motherboard. If you plan to store the unit for more than thirty days, remove the power source entirely.
Avoid SD cards with speeds lower than Class 10. Modern cameras write data in rapid bursts; a slow card creates a bottleneck that triggers system crashes or corrupts the final file. Always check the manufacturer’s maximum capacity limit, as exceeding it often causes the camera to fail during the boot sequence.
If your model supports it, install firmware updates immediately. These patches often resolve power-draw bugs that drain batteries prematurely.
Placing the camera facing the sun causes false triggers and washed-out images, which many users mistake for a broken sensor. Always mount your camera facing North or South to avoid the arc of the sun. If you must face East or West, tilt the camera slightly downward to minimize direct lens flare. If the images appear consistently white, the sensor is likely overwhelmed by light, not broken. Adjust the sensitivity settings to medium to prevent false triggers from moving branches.
Maintaining your device for longevity
To keep your camera running for several seasons, you must align your maintenance habits with the changing conditions of the field. A camera used in a humid, forested environment requires more frequent cleaning than one used in a dry, open field. Moisture trapped in the casing accelerates internal corrosion, so check the rubber seals every three months for cracks or debris buildup.
If you’re storing your gear for more than thirty days, remove the batteries entirely. Even high-quality cells can leak acidic discharge when dormant, which permanently ruins the motherboard. If you find white, crusty residue on the contacts, use a cotton swab dipped in isopropyl alcohol to gently clean the alkaline deposits.
Switch to lithium batteries for all winter deployments. Standard alkaline batteries suffer from high internal resistance in freezing temperatures, causing them to report as “dead” even when they hold significant charge. Lithium cells maintain steady voltage output down to negative forty degrees.
When cleaning the lens, never use water or paper towels. Wood fibers in paper create microscopic abrasions that fog your images over time. Use a dedicated microfiber cloth and a gentle circular motion. If the glass is caked in mud, use a soft-bristled brush to remove grit first to avoid grinding particles into the lens coating.
Related guides
Frequently asked questions
How long should the batteries last?
Most cameras last 3 to 6 months depending on usage and infrared flash settings. Battery life drops by at least 30 percent in freezing temperatures. If batteries drain in under a month, reduce video length or the number of photos taken per trigger.
Why is my camera taking blank photos?
Blank photos occur when the motion sensor detects moving branches or grass before the subject enters the frame. Clear any vegetation within 10 feet of the lens to resolve this. You may also set motion sensitivity to “low” in dense, windy areas to prevent false triggers.
Is it safe to use a 128GB memory card?
Most older models only support cards up to 32GB, and exceeding this limit will cause the device to freeze. Check your manual or the battery door for the specific maximum storage capacity. Using a card that’s too large will cause formatting failures or stop recording entirely.
How do I know if the sensor is broken?
A broken sensor will show no reaction during a walk-through test even after a factory reset. If the camera triggers manually but not automatically, the PIR sensor is likely dead. There’s no home repair for this component, so contact the manufacturer for a warranty claim.
What happens if the camera gets wet inside?
Water inside the housing will likely cause permanent circuit board corrosion and failure. Immediately remove the batteries and dry the camera with a desiccant pack for 48 hours. Avoid using hair dryers or direct heat, as these can melt seals or warp internal components.
Conclusion
If your device still won’t cooperate after these checks, don’t worry. You should reach out to the manufacturer’s support team through their website to see if your unit is covered under warranty. They’ll help you figure out if it’s a hardware defect so you can get back to scouting soon.