Building a dedicated RC rock crawling course in your basement sounds like a project reserved (and that implies quite a bit) for guys with deep pockets. A full construction crew. Nope. You can pull it off this weekend for less than the cost of a new set of tires.
What this means is the hobby has exploded with builders using cheap styrofoam, grout. A few days of patience to create terrain that rivals professional tracks. There’s a catch. Probably and a few smart decisions upfront keep you from wasting money and time.
Key Point
- Focus on styrofoam and grout for lightweight, durable tracks that won’t crack your floor joists. The method has been battle‑tested by the RC community for years.
- Plan for 2-3 days of drying time between layers, or you’ll end up with a mess that flakes off after a month. Impatience is the #1 destroyer of DIY courses.
- Grab free materials from Craigslist furniture stores before buying anything. That move alone can keep your total under $200, according to multiple forum builds I’ve seen.
- Treat the first version as a test layout. Let your rig chew on it for a week, then adjust. Modular thinking saves you from tearing the whole thing down.
Why Build an Indoor RC Crawler Course?
From a practical standpoint, year-round crawling without a coat and gloves. That’s the obvious win. M.In a basement or spare shop, an 8×10 foot footprint gives you enough room for technical lines, step-downs, and sand sections that rival outdoor spots. This is just one piece of the puzzle.
Here’s a truth most builders learn too late. RC crawling isn’t just for gearheads.
It’s oddly meditative. Watching a rig inch up a near‑vertical foam rock draws you in.
It is up to you. Kids pick it up snappy. If you’ve got a child who isn’t into traditional sports, I’ve shared some tips for raising non‑athletic children that pair nicely with a hands‑on hobby like this.
The low-stakes thrill works for just about anyone.
Consider this practical perspective. In most cases, outdoor rocks hide sharp edges that snap axles; your track’s surfaces are predictable, so you can push the truck’s limits without risking a $50 part. And the trend keeps going. That predictability makes the build worth every hour.
The Best Cheap Materials for a Realistic Track
Styrofoam is the superstar. It’s light, carves easily, and.
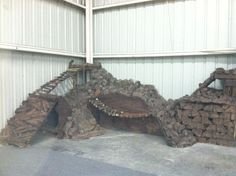
When coated right, looks like real sandstone. The go‑to method circulating on RCCrawler Forums for ages goes like this: find a furniture store dumping big foam blocks. But wait, there's more to it. Haul them home for free, shape them with a hacksaw blade and rasp, then coat with (which aligns with standard practices) 3-4 layers of grout.
Keep this in mind; it shows up again soon.
“I got a car full of free styrofoam off Craigslist from a furniture store, some grout from Home Depot and some concrete stain. Covered with 3-4 layers of grout and painted. Came out really nice!” — RCCrawler forums member
That quote sums up the entire budget‑friendly philosophy. Concrete stain adds color without paint that peels. For micro courses, cardboard boxes and plaster work shockingly well. From a practical standpoint, you can build a table‑top track for under $40.
Where does the money actually go? Here’s a rough breakdown I’ve pieced together from about 15 documented builds over the last year.
Typical Build Cost Breakdown
$0
~$30
~$15
~$50
A cheap build can turn into a crumbling mess if you skip the most boring step: drying time. Exactly right. Actually, let me put that more precisely.
Between each grout layer, you need a solid 48 (and that implies quite a bit) hours in dry air. Rush it, and the base coat separates from the foam.
You’ll see cracks within a month.
Design a Course That Challenges Even the Best Rigs
Taking a step back reveals an important factor. A pile of coated foam isn’t a course.The difference lives in transitions, blind lines.
“The way you spell out the trail, the place where you’re really supposed to drive the course, is by putting plants where you’re not really supposed to drive so the most difficult sections are not obvious at first glance.”
Looking at things today, that single design trick separates a memorable crawl from a boring drive. Place bushes, small rocks. Or fake foliage to funnel the rig into, I mean, a technical pinch point without an obvious marker. The driver has to read the terrain, not your neon arrows.
Across the board, step‑downs and sand pits add another layer. Sand displaces under the tires. Forcing the truck to find grip on every pass. It also lets you tweak difficulty by just sweeping it around between runs.
Modular sand sections are brilliant for testing. Because nothing is permanent.
For about $10 in play sand, you create a constantly shifting obstacle. Yet, context matters heavily.
This brings us back to what we started with, i’ll go against the grain on one thing. Many forum posts say to build massive, all‑in‑one sculptures. A lightweight 2×2 foot foam chunk can be reconfigured into a dozen different layouts. When boredom hits; which it'll after a couple months, you just rearrange.
No sledgehammer required. Professional custom courses, like those Mt.
Steadfast designs, lean heavily on modular thinking for a reason.
In practice, the dynamic changes slightly. Granted, avoid the rookie mistake of making obstacles too steep (as one might expect) right out of the gate. If your rig can’t clear it in a dozen tried.
It’s not a challenge; it’s frustration. Start with gentle inclines and build up, and test with a stock SCX10 or TRX‑4 before (and the data generally agrees) committing to a vertical wall.
The beauty of styrofoam is that a rasp. And fresh grout fix anything in an afternoon.
FAQs
How long does it take to build an indoor RC crawler course?
Figure about two weekends for a basic 8×10 layout using the grout method. Most of that's waiting. Between carving — coating; and drying.
You’re looking at 6-8 hours of actual hands‑on work spread over 10-14 days. A micro cardboard course can be done in a single afternoon.
Can I build a micro course in a small apartment?
Moving on to something related, absolutely. A 4×4 foot tabletop track made from cardboard, plaster cloth, and hobby‑store pebbles fits on a coffee table. Spry paint and fake plants keep weight under 20 pounds.
Several builders run micro rigs on just 3 square feet of track. No excuses.
What’s the biggest mistake first‑time builders make?
Skimping on grout layers. One or two coats look okay for a week, then the foam starts to show through.
Plus, the extra two layers cost maybe $10 in grout (and that implies quite a bit) and add years of life. Also, ignoring interior ventilation; grout and stain need fresh air to cure properly.
Open a window, please.
Ready to Get Your Rig Dirty?
You don’t need a 20×30 foot shop or a six‑month timeline.Start this weekend (though exceptions exist, naturally) with a single 2×2 module. Snap photos, post them in the forums, and watch your driving improve because the terrain you build teaches you more than any pre‑made route ever could. The follow-up question is obvious. What this means is now go grab that free styrofoam before someone else does.
🔍 Research Sources
Verified high-authority references used for this article